Am writing the pattern for the featured U-pin lace scarf featured in the magazine Femina, as many have asked for an English version
Let me know what you think of this tutorial guys; I can’t wait to see your amazing scarfs
any queries can be to y Facebook page and please link your piece on my facebook page hunar the crafting hands
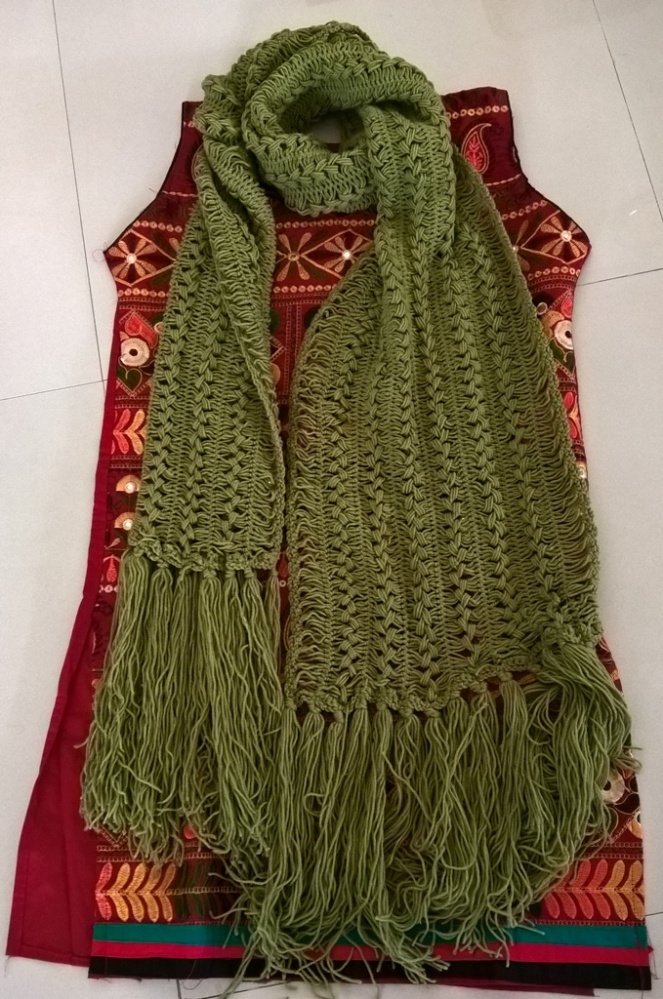
MEASUREMENTS Approx 90″ x 14″ [230 x 35 cm]. without fringes
MATERIALS
acryilic yarn
acryilic yarn
crochet hook Size 4 mm
Hairpin crochet staple 3 inches
Hairpin crochet staple 3 inches
ABBREVIATIONS
- Approx = Approximately
- Rep = Repeat
- Tog = Together
- Yoh = Yarn over hook
- Sc =single crochet
- Ch = chain
HOW TO “U-PIN LACE”
BASIC STRIP
- Wrap yarn around the back of staple, placing yarn end on left side of the staple and working yarn on right side.
- Bring working yarn to front of staple, crossing over to left side of staple.
- Bring yarn end to front of staple, crossing over to right side of staple. This should form an “X”.
- Wrap yarn end around bottom of “X” to the back, around all yarns and then bring back to the front of staple.
- Tie a knot around “X” using the yarn end and working yarn. Make sure knot is centered. Drop yarn end.
- Holding working yarn, cross over to right side of staple, wrapping to the back.
- Insert hook into left loop from the bottom, yoh and draw up a loop.
- Yoh and draw through all loops on hook.
- Keeping working loop on hook, ip hook to back of staple (through the loom and over the top of work).
- Hold working yarn in left hand and rotate staple, bringing right side to left side. Working yarn will now be wrapped around right side of loom, ready for the next stitch.
- Insert hook in upper left loop. Yoh and draw up a loop.
- Yoh and draw through all loops on hook.
- Rep Steps 9-12 required number of times. Mark every 30 loops for easier counting.
- To finish Strip, break yarn, leaving a long tail and thread through remaining loop on hook.
- Remove Strip from staple and roll Strip from the top to the bottom, until ready to use.
BASIC JOINING TECHNIQUE
Joining Strips 1 and 2 (starting with a left strip)
- Lay 2 Strips side by side on a flat surface and unroll slightly.
- Working with Strip on the left, insert hook through first 3 loops on right side of Strip.
- Working with Strip in the right, insert hook through first 3 loops on left side of Strip and draw through 3 loops on hook.
- Insert hook through next 3 loops of left Strip and draw through 3 loops on hook.
- Insert hook through next 3 loops of right Strip and draw through 3 loops on hook.
- Unrolling Strips as needed, rep Steps 4 and 5 until end of Strip.
- Using a piece of scrap yarn, secure end temporarily so Strip will not unravel.
Joining Strips 2 and 3 (starting with a right strip)
- On a at surface, lay Strip 3 to the right of joined Strips 1 and 2. Unroll slightly.
- Starting with the Strip on the right (Strip 3), insert hook in first 3 loops on left side of Strip.
- Working with Strip on the left (joined Strips 1 and 2), insert hook through first 3 loops of right side of Strip and draw through 3 loops on hook.
- Insert hook though next 3 loops on right Strip and draw through 3 loops on hook.
- Insert hook through next 3 loops on left Strip and draw through 3 loops on hook.
- Rep Steps 4 and 5 until end of Strip.
- Using a piece of scrap yarn, secure end temporarily so Strip will not unravel.
Continue joining Strips as established, making sure to alternate starting with a left strip or right strip otherwise work will begin to slant.
FINISHING SIDE EDGES
- Insert hook into first 3 loops of Strip. make 2 sc in the loop, ch 1
- Rep step 1 until the end of the strip
- For the smaller side ( width of scarf)
- Make 4 sc in the long side of the loop, ch1
- Rep step 4 until the end of the width of the scarf
Fringe
Cut 12″ [30.5 cm] lengths of yarn.
Taking 10 strands tog, knot into fringe evenly across top and bottom of scarf. Make sure to loop fringe through both working loops along top edge so the scarf will not unravel. Trim ends evenly
